molSimplify Tutorial 1: Structure Generation


In our first tutorial, we’ll briefly discuss how to use molSimplify to generate simple coordination complexes. Our example today is a cobalt porphyrin with an imidazole axial ligand and an empty 6th coordination site.
Before starting the tutorial, please remember to activate your conda environment using the following syntax, where environment_name is the name of your conda environment:
conda activate <environment_name>
Graphical User Interface
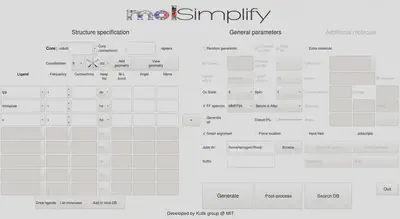
Firstly, we’ll show how to use the graphical user interface (GUI). The GUI can be started by entering molsimplify at the command line with no additional arguments. A new window resembling the image below should open on your screen.

Within the GUI, hovering over each textbox brings up a popup briefly explaining its purpose. For structure generation, the only required inputs are to specify the core, coordination number/geometry and the list of ligands (left side of the figure above).
First, reproduce the settings in the image above by selecting cobalt as the core, a coordination number of 6, and oct to set an octahedral coordination environment.
The available ligands can be checked by clicking the drop down box. Add ligands one row at a time. Once you have selected a ligand and designated a frequency, you can add another row by pressing the plus (+) button to the right of the active ligand row. Add a tpp ligand (tetraphenylporphyrin), an imidazole ligand, and an x ligand, where the x ligand represents a vacant coordination site.
Other optional features that are relevant to structure generation include:
- keep Hs: By default, one hydrogen atom (if present) is stripped from each coordinating atom (
-keepHs no). This is beneficial in most cases but should be disabled (-keepHs yes) in some cases such as ammonia or ethylenediamine - specifying the oxidation and spin state, which activates spin- and oxidation-state-dependent metal-ligand bond lengths that are generally of higher quality than the default sum of covalent radii
- FF optimization (off by default), which activates partial force field optimizations that significantly improve structures containing bulky ligands
- Smart alignment (on by default), which adds ligands to the complex in the best possible order
- Force location (off by default), which fixes ligand positions to allow for specific stereoisomers (e.g., fac/mer) to be generated
- Jobs dir, which specifies the location where the output files are saved
The user guide and molSimplify publication can be referenced for more details.
Clicking Generate should run the code and a popup window should appear if successful. An xyz file containing 3D coordinates of the complex should appear in the Jobs dir folder, which may then be viewed/edited by structure editors such as Avogadro. Additionally, a command line interface (CLI) input file (see below) should also be generated.
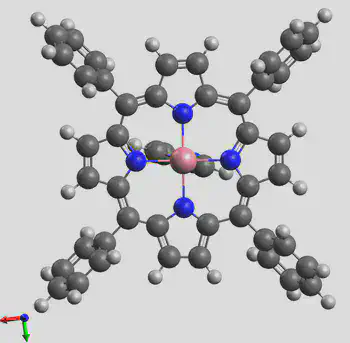
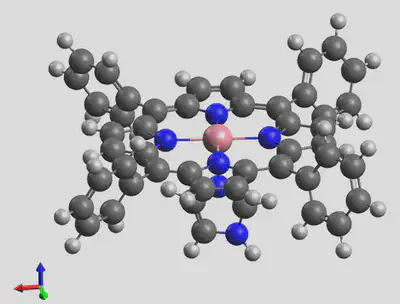
The generated structure is shown here:


Command Line Interface and Input-file-based Generation
Next, we’ll show how to use the input file generation. For the purposes of this tutorial, we’ve created a file for you called example-1.in that will generate a porphyrin with an imidazole ligand. You can download it here. Alternatively, one could also copy and rename the input file generated from running the GUI. The options can also be entered into the command line manually.
-core cobalt
-geometry oct
-coord 6
-lig tpp,imidazole,x
-ligocc 1,1,1
-ff MMFF94
-ffoption BA
-spin 2
-oxstate II
molSimplify input files contain one line per option (options that are not specified take their default values), with # signifying a comment (and not read) as in Python. Please remove any comments before running a molSimplify input file.
Now, ensure that you are in the directory that contains the example-1.in input file, and run the following in the command window:
molsimplify -i example-1.in
Be sure to include the -i flag so that molSimplify will read the input file provided. If successful, you should get the same output as the previous GUI run. Job status is written to the command window.
You may see an openbabel warning with the following lines: Open Babel Warning in GetAtomicNum.
This is a harmless warning regarding the site with no ligand, and it can be ignored.
In subsequent tutorials, we’ll demonstrate other capabilities of molSimplify, including the custom core functionalization feature and database search features.
Notes on structure generation:
-
One can have
-ligloc Truein the input file to make sure that the order of the input ligands is maintained in the octahedral structure generation, where ligands will be placed at the equatorial plane first then the axial plane. -
For SMILES string ligands, one can use the keyword
smicatto control which atoms should be connected to the metal. For example,-smicat [[1, 4], [2, 7], [5], [1]]tells molSimplify to generate a complex with two bidentate ligands in the equatorial plane and two monodentate ligands at the axial plane. For the first bidentate, the first and fourth atom in the SMILES string would be the connecting atoms (C and O for a SMILES string ofC=NCO). -
In the command line, you can enter a command like:
molsimplify -core Fe -geometry li -lig benzene_pi -oxstate 2 -ligocc 2 -spin 0 -coord 2. One can also specify multiple types of ligands, with a command that looks like the following:molsimplify -core Ir -oxstate 3 -spin 1 -geometry oct -lig h2o cl -ligocc 4 2 -coord 6. -
Available coordination geometries are present in
molSimplify/molSimplify/Data/coordinations.dict. For more information, use the commandmolsimplify -hin the command line. -
One can also use molSimplify to generate structures with Python code, using the startgen_pythonic function in
molSimplify/Scripts/generator.py.
from molSimplify.Scripts.generator import startgen_pythonic
input_dict = {
'-core': 'ir',
'-lig': 'h2o',
'-ligocc': '6',
'-oxstate': '3',
'-geometry': 'oct',
'-coord': '6',
'-spin': '1',
}

startgen_pythonic(input_dict=input_dict, write=True)
-
Structure construction via a web interface is available for a limited number of metals and ligands. See https://molsimplify.mit.edu/.
-
For information on how to add custom ligands, please see Tutorial 10.
Scripts and files: